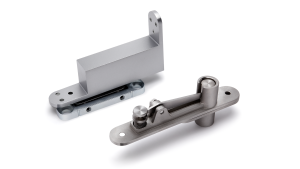
Hidden doors have become a popular design choice in modern architecture, allowing for seamless transitions between spaces while maintaining a clean aesthetic. The key to achieving this sleek look lies in the installation of pivot hinges, which provide functionality without compromising design. This article will guide you through the installation process of pivot hinges for hidden doors, highlighting essential steps and considerations.
Functional and Stylish Pivot Hinges for Hidden Doors
Pivot hinges are distinct from traditional side-mounted hinges. They allow a door to rotate around a single point located at the top and bottom of the door, making them ideal for hidden or concealed applications. This design enables doors to swing open without any visible hardware, creating a minimalist appearance that is both functional and stylish.
Benefits of Using Pivot Hinges
- Aesthetic Appeal: The invisibility of the hinges when the door is closed enhances the overall look of the space.
- Space Efficiency: Pivot doors can open wider than traditional doors, providing easier access and a more open feel.
- Durability: Designed to support heavier doors, pivot hinges are ideal for solid wood or custom-designed doors.
Tools and Materials Needed
Before you begin the installation of pivot hinges, gather the following tools and materials:
- Pivot hinges (specific for hidden doors)
- Screwdriver (Phillips or flathead)
- Measuring tape
- Level
- Chisel
- Drill
- Wood filler (if necessary)
Having these tools ready will streamline the installation process and help ensure a successful outcome.
Step-by-Step Installation Process
- Measure and Mark
Start by measuring the door and frame where the pivot hinges will be installed. Mark the locations for the top and bottom pivot points, ensuring they are aligned vertically. This step is crucial, as accurate placement will affect the door’s operation.
- Prepare the Door
Using a chisel, create mortises at the marked locations on the door for the pivot hinges. These mortises should be deep enough to accommodate the hinge’s thickness, allowing the door to sit flush against the frame.
- Install the Top Pivot Hinge
Position the top pivot hinge in the mortise and secure it using screws. Ensure it is level and aligned properly. This hinge will bear the weight of the door, so proper installation is essential.
- Install the Bottom Pivot Hinge
Repeat the process for the bottom pivot hinge. It’s important that both hinges are aligned accurately to ensure smooth operation. The bottom hinge often includes an adjustment feature, which can be useful for fine-tuning the door’s position later.
- Hang the Door
With both hinges installed, carefully lift the door and place the top pivot hinge into its corresponding bracket in the frame. Once the top hinge is in place, align the bottom hinge with its bracket and secure it. Check that the door swings freely without any obstruction.
- Adjust as Necessary
After hanging the door, test its operation. If it doesn’t close properly or is misaligned, make adjustments to the bottom pivot hinge. Many pivot hinges come with adjustment screws that allow for slight repositioning without removing the door.
- Final Touches
Once the door operates smoothly, apply any necessary wood filler to cover screw holes or imperfections. Sand the area for a clean finish and ensure that the door aligns well with the frame.
Conclusion
Installing pivot hinges for hidden doors can transform the functionality and aesthetics of a space. By following these steps, you can achieve a seamless look while ensuring the door operates effectively. For those seeking high-quality hardware solutions, consider exploring door hinges wholesale options. At SMED, we have 22 years of industry experience, providing exceptional products designed to meet diverse architectural needs. Our commitment to quality and innovation ensures that your hidden door projects are not only functional but also elevate the overall design of your space.
